
Slate Installation Knowledge Base
This how-to guide provides a practical introduction to slate roofing installation, outlining the essential steps and techniques required for a successful project. From proper deck preparation and underlayment to precise slate layout and fastening, each stage plays a critical role in ensuring durability and performance. Attention to key details such as headlap, flashing, and ventilation helps prevent premature failure and extends the life of the roof. Following recognized industry standards, including guidance from the Mobile Field Guide made available from the National Slate Association, ensures best practices are met. With the right approach, a properly installed slate roof can deliver lasting beauty and protection for generations.
Understanding Slate Roofing Systems

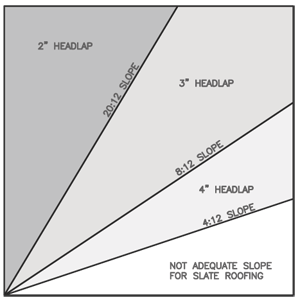
Understanding slate roofing systems is the foundation of a successful installation. A slate roof is a carefully layered system in which each component works together to create a durable, weather-resistant barrier. At its core, a slate roofing system relies on overlapping courses of slate tiles, using proper headlap to effectively shed water and prevent infiltration. High-quality materials, including natural slate shingles, copper slating nails, durable flashing, and reliable underlayment, are essential to ensure long-term performance. Equally important are roof pitch and overall design, as slope directly impacts how water drains and how slate shingles are installed. Steeper pitches typically enhance water shedding, while complex roof designs require thoughtful detailing. By understanding how these elements interact, installers can build slate roofs that deliver both lasting protection and timeless aesthetic appeal.
Step-by-Step Slate Roof Installation Process
-
Step 1: Prepare the Roof Deck
Begin by inspecting the roof deck for any signs of damage, rot, or instability. Replace or repair compromised sections to ensure a solid, level, and structurally sound base. A properly prepared deck is essential for supporting the weight and longevity of a slate roofing system.
-
Step 2: Install Underlayment
Apply a high-quality roofing underlayment across the entire deck to create a continuous moisture barrier. This layer provides secondary protection against water infiltration and helps safeguard the structure beneath the slate.
-
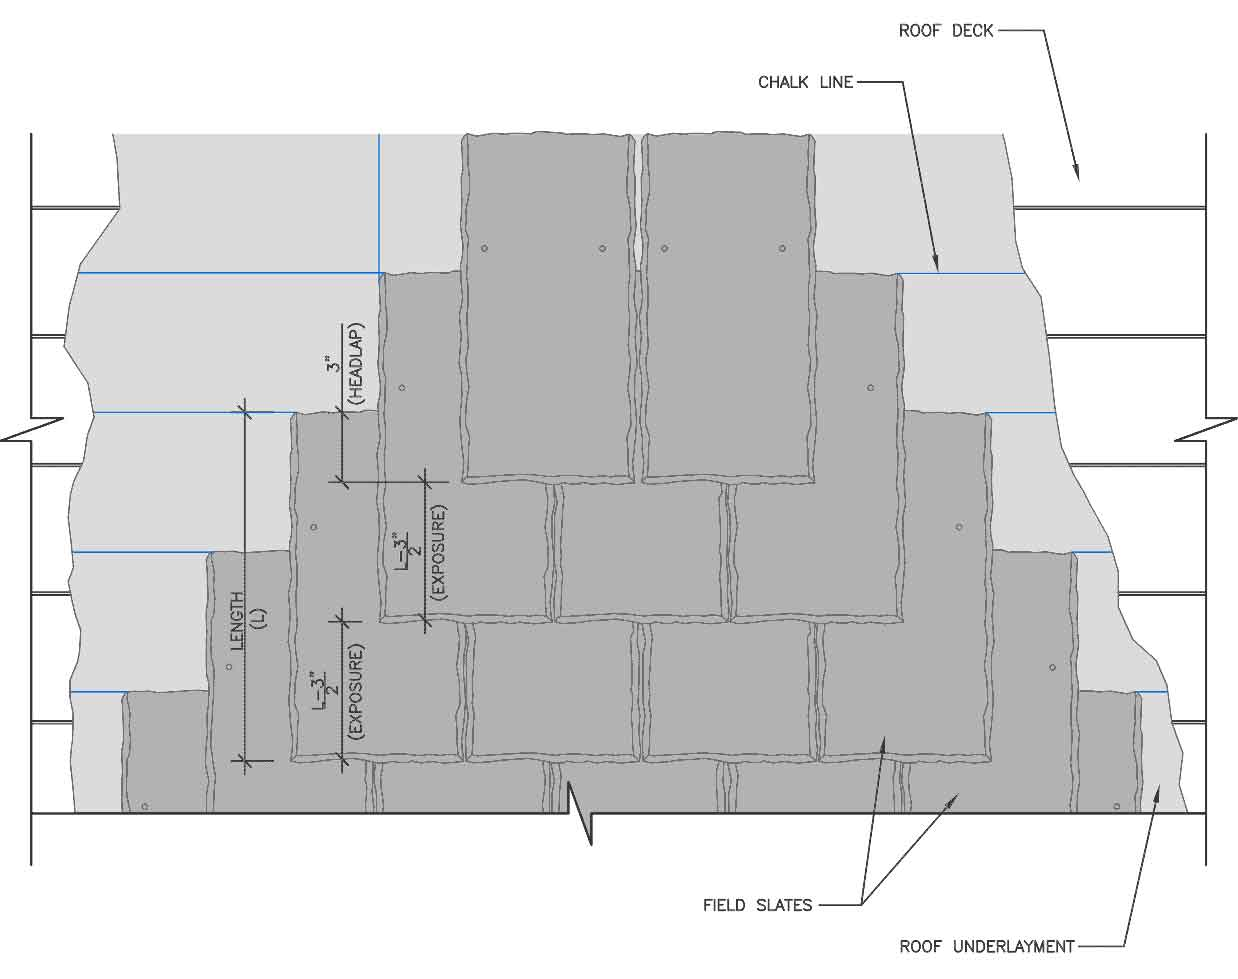
Step 3: Layout and Chalk Lines
Mark accurate chalk lines across the roof surface to guide slate placement. Proper layout ensures consistent course spacing, straight alignment, and uniform exposure, all of which are critical for both performance and appearance.
-
Step 4: Install Starter Course
Install the starter course along the eaves to establish a secure base for the first row of slate. This step supports correct alignment and promotes effective water shedding at the roof edge.

-
Step 5: Install Slate Tiles (Nailing Pattern)
Begin installing slate tiles using the correct nailing pattern, ensuring each slate is properly overlapped according to headlap requirements. Consistent fastening and spacing are key to durability and wind resistance.
-
Step 6: Flashing Installation
Install flashing at all valleys, chimneys, skylights, vents, and roof transitions. Properly integrated flashing directs water away from vulnerable areas and prevents leaks.
-
Step 7: Ridge and Finishing
Complete the roof by installing ridge slates and final finishing details. Ensure all components are secure, aligned, and weather-tight for a clean, durable, and visually consistent slate roof system.
Layout and Planning for Slate Roof Installation
Proper layout and planning are essential before beginning any slate roof installation, as they establish the framework for accuracy, performance, and long-term durability. Installers first assess roof dimensions and design to determine the appropriate slate size, which directly influences exposure and course spacing.
Exposure (the visible portion of each slate) is carefully calculated to maintain consistent alignment and proper water shedding across the roof surface.
Equally important is calculating headlap, the overlapping distance between courses, which ensures effective runoff and prevents water infiltration under varying weather conditions. Accurate headlap calculations are critical to overall roof longevity. Before installation begins, a structurally sound roof deck must be inspected, repaired if necessary, and prepared to provide a stable foundation. A high-quality underlayment is then applied to create an additional moisture barrier, protecting the structure beneath.
Together, these planning steps ensure the slate system performs as intended and meets industry standards.