
Basic Practice & Special Considerations
Closed Valley
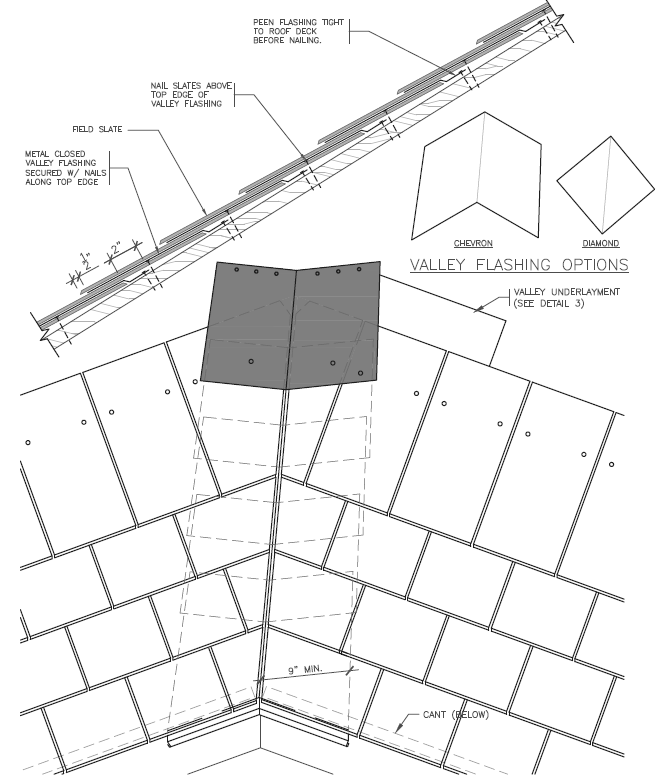
Valley Flashing Width: A common width for closed valley flashings is 18” (9” each side of valley centerline). In addition to rectangular flashings, chevron and diamond-shaped flashings may also be used.
Special Considerations: Consider using wider valley flashings when the adjacent roof slopes are not very steep. Consider increasing the width of the flashings near the bottom end of the valley should the valley be very long or snow loads be severe.
Valley Flashing Length: As a general rule, the length of each flashing is equal to the exposure of the slate, plus the headlap, plus another 1 to 2 inches. Each flashing should be long enough to lap the flashing below at least 3” (more if slope and climate conditions warrant)
Installation: Closed Valley flashings are interwoven with each course of slate. The butt ends of the slates in each course on either side of the valley centerline should align. The upper corner or the slate shingle laid along the valley line is often clipped to allow the slate to lay correctly and to direct moisture toward the valley centerline.
Nailing: Avoid nailing directly through the valley flashings. Consider the following techniques:
- Use wider slates adjacent to valleys
- Place 2 nails, one above the other, along the edge of the slate furthest from the valley centerline
- Secure the slates with copper wires fastened to the roof deck further upslope, above the valley flashing
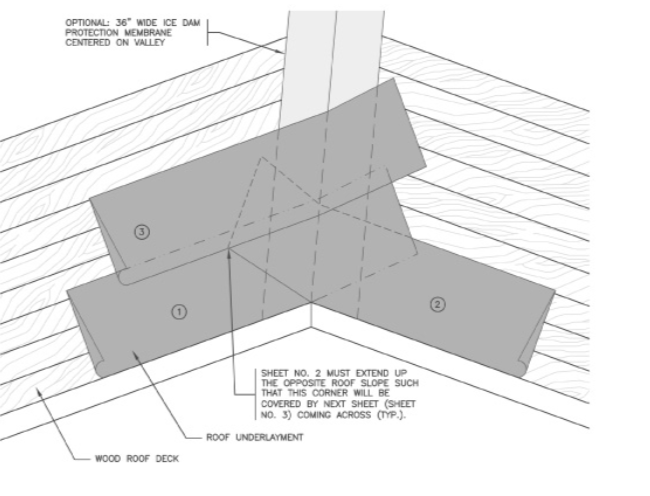
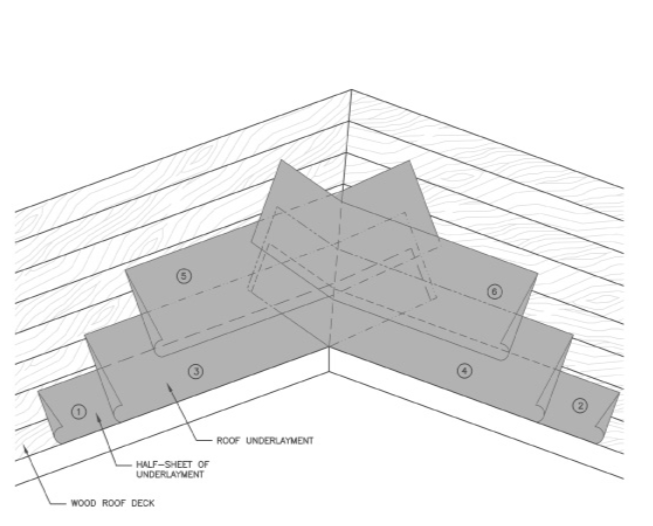
Underlayments for Woven Valley:
Whether a single or double layer of underlayment is to be woven across the valley depends on the number of layers of underlayment being installed in the field of the roof. The underlayments must cross the valley and extend far enough up the opposite slope such that their lower outside corner is completely covered by the next course of underlayment coming from the opposite direction.
Special Considerations: If ice dam protection membrane is being installed at the roof eave, the membrane should be installed in the valley at least to the same height as that at the eave. WIth woven valley underlayments, it is not possible to lap the roof underlayment on top of the metal valley flashing or to strip-in the edges of the valley flashing with ice dam protection membrane.
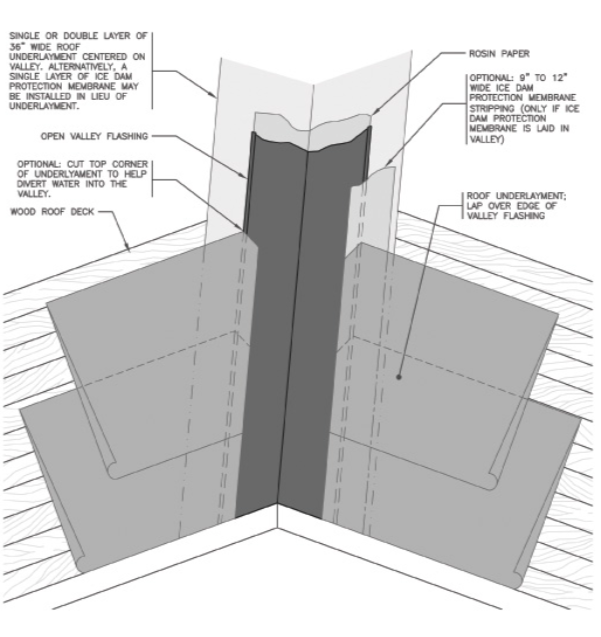
Overlapping Valley Underlayment: In this type of system, a single or double layer of underlayment is installed longitudinally, at the center of the valley. After the open valley flashing is installed, roof underlayments on the roof slopes adjacent to the valley are laid to lap on top of the valley flashing and trimmed to just above where the slate line will be.
The top corner of each course of underlayment is typically trimmed to help direct stray water toward the center of the valley.
Special Considerations: Overlapping valley underlayment is not recommended for closed valleys. As with woven valleys, ice dam membrane may be placed the full length of the valley, or just at the eave. For added protection in severe climates, the edges of the open valley flashing may be covered with a strip of ice dam protection membrane. The membrane should be adhered directly to the valley flashing and to a width of similar underlying material laid at the center of the valley.
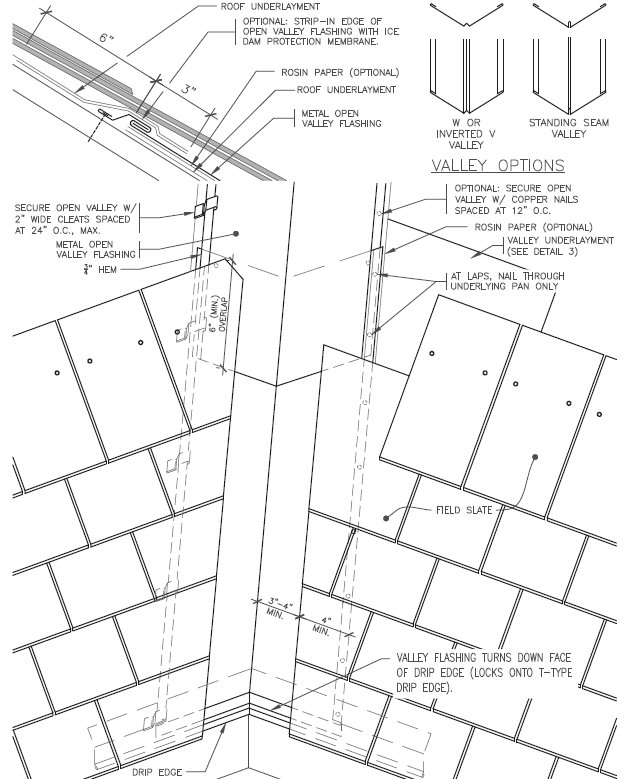
Open Valley
Underlayments: The roof underlayment may be woven at the valley or laid as a single strip centered on the valley.
Special Considerations: Use ice dam protection membrane directly on the roof deck where site and climate conditions warrant. Lay open valley flashings greater than 8-10 feet in length on rosin paper to help prevent sticking to the roof underlayment.
Valley Width: Minimum valley pan width is 16”; 4” exposed and 4” below the slate shingles each side of the valley centerline.
Special Considerations: Local climate, roof slope(s), adjacent tree canopy, total water volume, and valley length must all be considered and may warrant increasing the valley width.
Slating: Do not puncture the valley flashing with the slating nails. Use wider slates adjacent to the valley, place 2 nails on the upslope side of the slate, or hang the slates from copper wires to help with nailing away from the valley flashing.
Special Considerations:
- Clip the upper corner of the slate shingle laid along the valley to help direct moisture toward the valley centerline
- Try to avoid slates that come to a point or that have very narrow butts by using wider slates and carefully laying approach slates
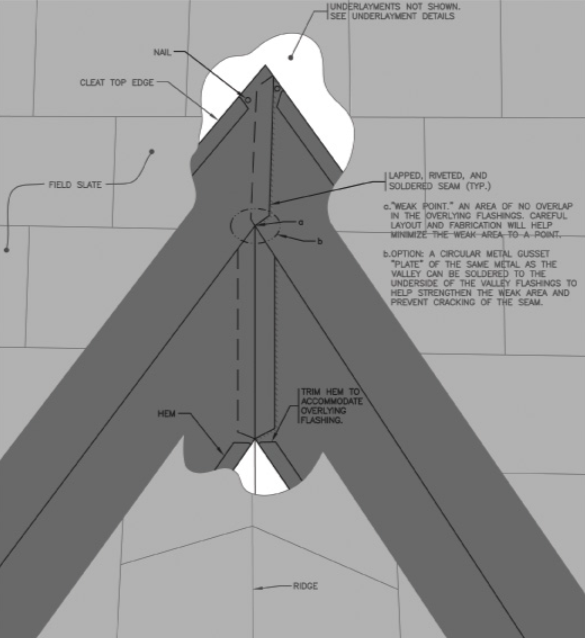
Top of Valley
- Special Considerations: If a metal ridge flashing is used, it can be used to flash the peak of the valley as well
- Seam Type: A lapped, riveted, and soldered seam is shown as this may be the easier to form and solder
- Special Considerations: Valley peak flashings are usually fabricated in the field as the angles must be precise in order for the flashing to lay flat on the roof deck.
Learn slate roofing installation techniques for hips, ridges, flashing, and approach slates to ensure lasting performance. Explore the guide!
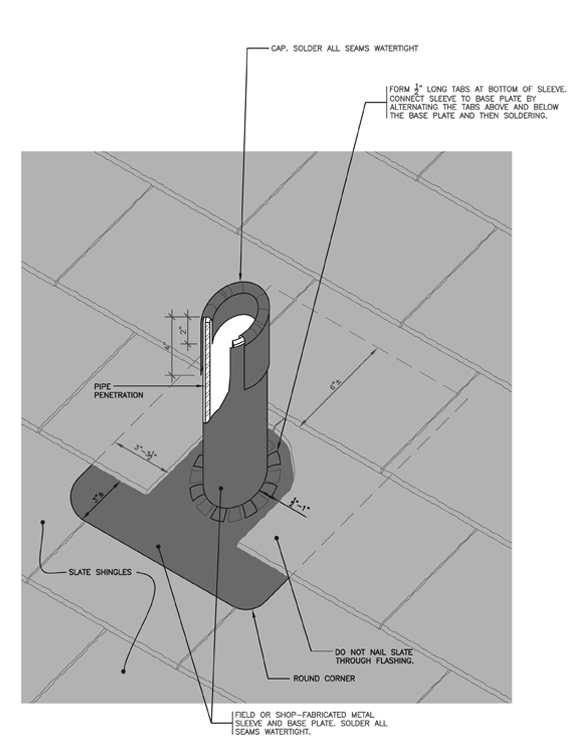
Vent Pipe
Basic Construction: Metal vent pipe boots are generally more durable than pre-manufactured neoprene boots, as the neoprene tends to become brittle over time. Neoprene boots are not recommended for use on slate roofs.
Base Plate Size: The bottom edge of the base plate should lap over the slates below sufficiently to maintain the required headlap. The sides of the base plate should extend below the slate to maintain the required offset and provide for a ½” to 1” wide drainage.
Special Consideration: When installing the slate shingles, place the nails to avoid puncturing the base plate.
Base Plate – Sleeve Connection: To help ensure the connection remains watertight, the seam should be thoroughly soldered.
Special Consideration: For added protection against condensation and leakage, a self-adhering membrane target patch can be installed around the base of the pipe prior to installation of the roof underlayment.
Caps: Copper or lead caps can be snipped and soldered, or crumpled, and rolled into the pipe. Copper and stainless steel caps are often fabricated from 3 separate pieces – an inner flange, an outer flange, and a top – soldered together.
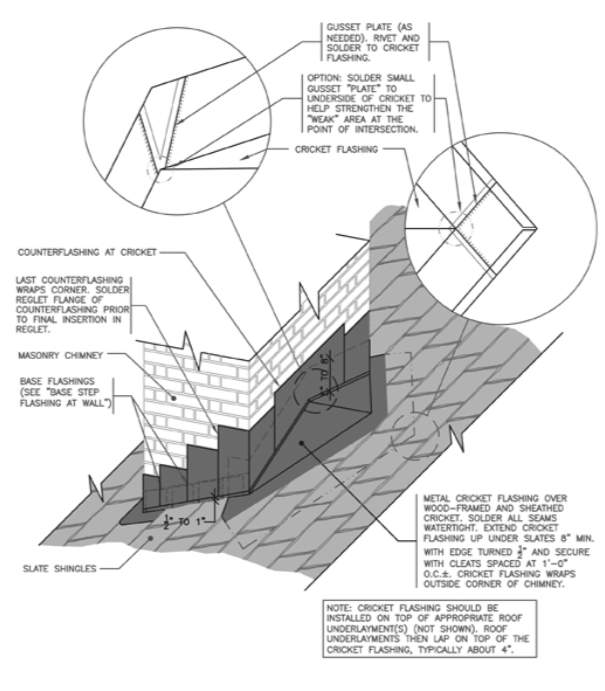
Chimney Cricket (Saddle)
Basic Construction: A one-piece metal cricket flashing is illustrated in the detail drawing. A two-piece metal cricket, with one soldered seam at the ridge of the cricket, is also common.
Special Consideration: If ice-damming is anticipated, snow guards can be installed to prevent sliding snow from building up in the cricket.
Drainage Paths: Slates located adjacent to the top outside corners of the chimney should be trimmed to permit water to drain out of the cricket. The width of the drainage paths – typically not less than about 2” – should be adequate to handle the anticipated flow of rainwater from the roof area above.
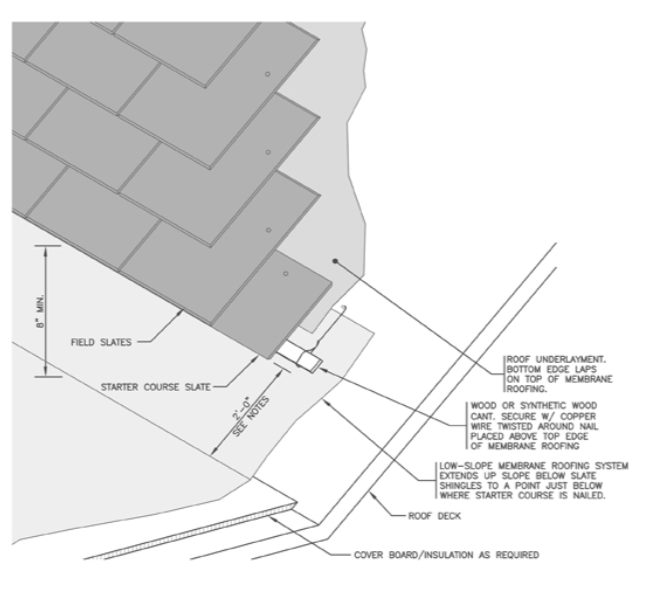
Transition: Low Slope Roof Below Slate
Removing Existing Slates: If replacing an existing low-sloped roof, review the correct method for removing slates located above the low-slope roof.
Flashing Height: Membrane should extend up the slope as needed to protect against build-up of sliding snow, or other factors.
Manufacturer Requirements: When installing low-sloped membrane, comply with manufacturer instructions for base tie-in and top termination.
Nailing: When installing slates above the low-slop roof, slating nails should be placed to avoid puncturing the membrane. The cant strip may be hung with copper wire which is also nailed above the top edge of the membrane.