
Types of Hip Installation Methods
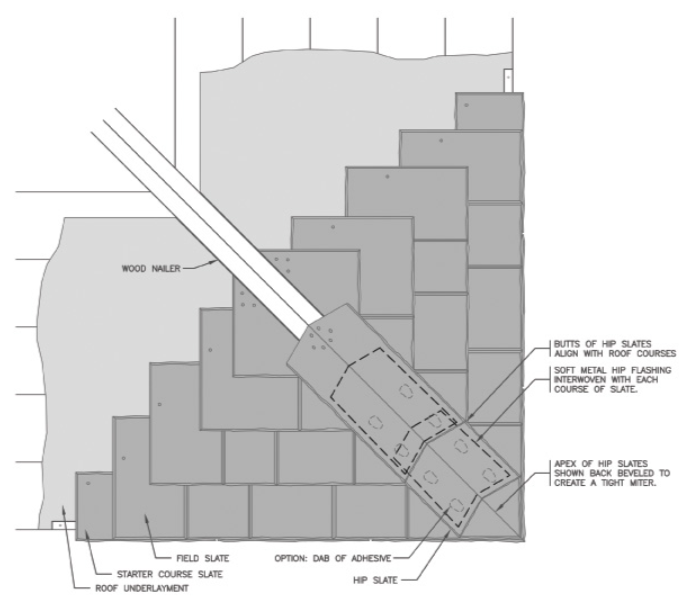
Saddle Hip:
Size: In general, the long dimension of a saddle hip slate should be about twice the exposure of the field slates and the short dimension about equal to the exposure of the field slates, rounded up to the next standard slate size.
Special Considerations: For a neater appearance and tighter joint, the long edge of the hip slate is trimmed to create a reverse bevel, allowing the pairs of hip slates to come together at the hip apex in a miter.
Installation: A properly detailed and installed hip starts with planning the approach slates to the hip. Hip lines are typically highly visible.
Flashing: Soft metal hip flashings are typically interwoven with each pair of hip slates in a course in order to provide for a more watertight joint at the apex of the hip.
Special Considerations: On roof slopes between 4:12 and 7:12, it is often beneficial to incorporate flashings into the hip slates.
Nailing: Saddle hip slates are secured with at least 3 nails each, set as far apart as possible in a triangular pattern. The butts of the hip slates may also be bedded in dabs of adhesive or trowel grade flashing cement. Longer nails than used for the field slates are often required for hip slates in order to achieve adequate penetration into the substrate.
Special Consideration: If 4 nails are used, they should be set as far apart as possible in a diamond or zigzag pattern. Consider using 5 or more nails per slate for larger and thicker slates.
Nailers: Wood nailers provide support for the hip slates in an even plan, flush with the top surface of the field slates. The use of dry, high-quality wood nailers at hips will prevent shrinkage, twisting, and warping of the nailers.
Mitered Hip:
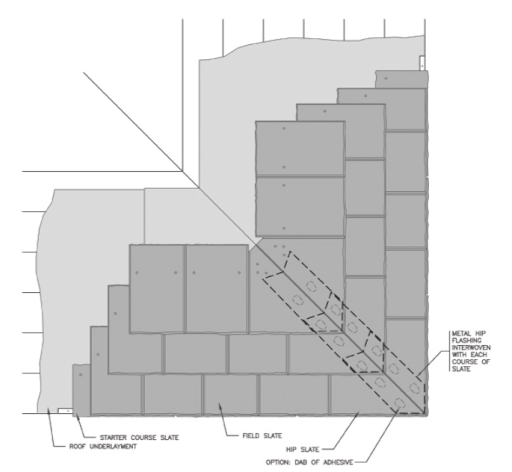
Size: The length of a mitered hip slate should be equal to the length of the field slates. The width of a mitered hip slate (and associated approach slates) should be as wide as possible to permit adequate space for nailing and to avoid small triangular slates.
Special Considerations: In finer work, the long edge of the hip slate is trimmed to create a reverse bevel, allowing the pairs of hip slates to come together at the hip apex in a miter.
Installation: A properly detailed and installed hip takes time and patience to install, and starts with planning the approach slates to the hip. Mitered hip slates are trimmed to conform to the apex of the hip and laid in the same plane as, and with their butts aligned with the field slates. Hip lines are typically visible.
Special Considerations: It is common practice to install mitered hips prior to running out the field slates on each side of the hip.
Flashing: Soft metal hip flashings can be interwoven with each pair of hip slates in a course in order to provide for a more watertight joint at the apex of the hip.
Special Considerations: On roof slopes between 4:12 and 7:12 it is often best to incorporate flashings into the hip slates.
Nailing: Mitered hip slates are secured with at least 3 nails each, set as far apart as possible in a triangular pattern. The butts of the hip slates may also be bedded in dabs of adhesive or trowel grade flashing cement (this tends to work best when flashings are not interwoven with the hip slates). In all cases, nails should be so placed as to be covered by the next course.
Special Considerations: If 4 nails are used, they should be set in an elongated diamond or zigzag pattern. Consider using 5 or more nails per slate for larger and thicker slates.
Note: Where exposed nail heads are unavoidable, they should be covered with sealant.
Saddle Ridge:
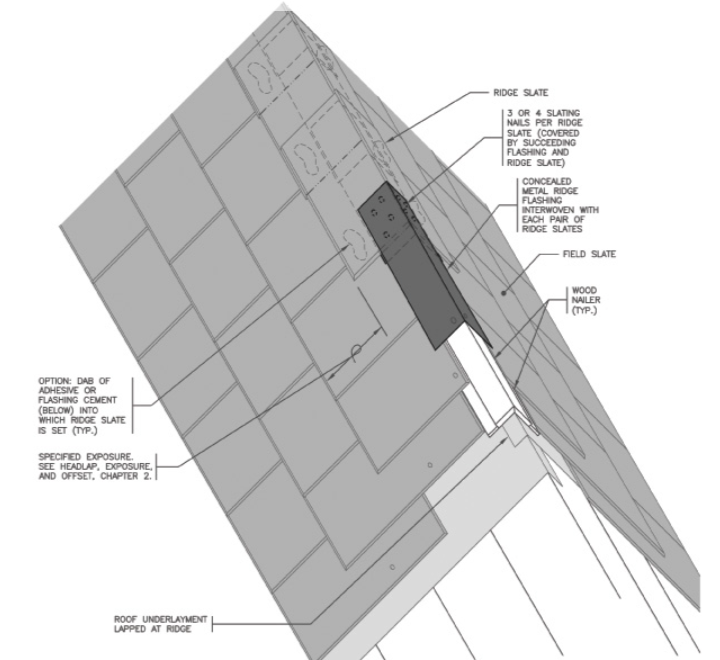
Size: In general, the long dimension of a saddle ridge is about twice the exposure of the field slates (but this can be varied to achieve different aesthetics), and the short dimension sufficient to maintain the required headlap over the second-to-last field slate. Both dimensions are typically rounded up to the next standard slate size.
Special Considerations: A saddle ridge will blend well with a saddle hip, but may not provide the desired appearance when combined with other types of hip treatments.
Special Considerations: For a neater appearance and a tighter joint, the long edge of the ridge slate is trimmed to create a reverse bevel, allowing the pairs of ridge slates to come together at the ridge apex in a miter.
Installation: A properly detailed and installed ridge starts with planning the approach slates to the ridge. Field slate below the ridge should be laid-out such that the exposure of the last, or finishing, course equals, or is slightly less than, that of adjacent field courses.
Saddle ridges are typically laid with an exposure equal to half of their length. Headlap is not required. As installation of ridge approaches an end point, adjustments (slight decreases) in the exposures of several pairs of ridge slates can be made to ensure that the last pair of ridge slates has the desired exposure.
Flashing: Soft metal flashings are typically interwoven with each pair of ridge slates in order to provide for a more watertight joint at the apex of the ridge. Alternatively, concealed flashings can be omitted and the ridge slates set in a 2-inch wide band of flashing cement.
Special Consideration: On roof slopes between 4:12 and 7:12 it is often beneficial to incorporate flashings into the ridge slates.
Nailing: Ridge slates are normally supplied unpunched to allow for custom punching in the field.
Slate Tip: If 4 nails are used, they should be set far as apart as possible in a diamond or zigzag pattern. Consider using 5 or more nails per slate for larger and thicker slates.
Nailers: Wood nailers provide support for the ridge slates in an even plane, flush with the top surface of the field slates. The use of dry, high-quality wood nailers at ridges will help prevent shrinkage, twisting, and warping of the nailers. A wood field nailer is needed when the length of the finishing course of slate is significantly less than the length of the last full-length course below. The field nailer supports the head of the slate so that when it is fastened, its butt end will not stick up.
Metal Ridge & Hip Flashing:
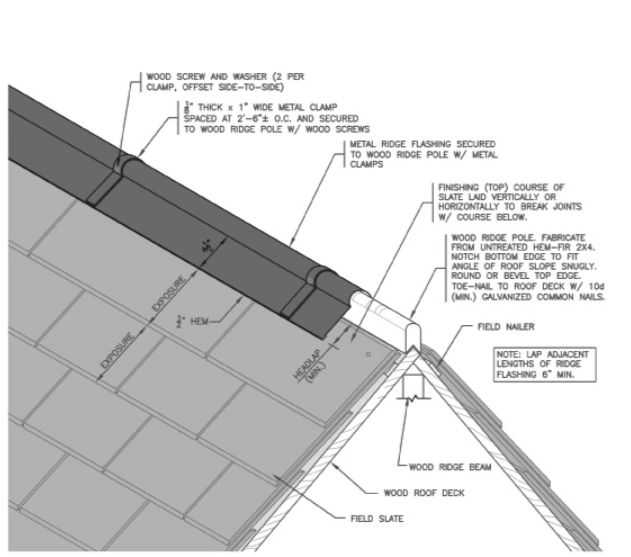
Construction: Metal ridge and hip flashings are most often constructed out of 16oz. Cold-rolled copper, although other metals could also be used.
The roof flange of these flashings must be securely fastened to prevent blow-off. Beyond the minimum width to achieve the required headlap, the width of the roof flange of ridge and hip flashings is largely governed by aesthetics and the flashing’s ability to resist wind uplift. It is also critical that the roof flange be wide enough to cover the heads of the nails used to secure the slates located adjacent to the ridge and hips.
Special Considerations: A roll at the apex of the ridge/hip helps to reduce the apparent overall size of the flashing and provides a place to secure the flashing that is less susceptible to water infiltration.
Approach Slates at Ridge: The exposure of the finishing (top) course of field slates should be as close as possible to the exposure of the field slates, or perhaps 1” to 4” less (how much less depends on the size and exposure of the field slates).
**The exposure of the finishing slates is determined by a well-planned approach to the ridge – adjusting (decreasing) the exposure of the field slates slightly, over several courses.
Clamps: Clamps should be rigid (⅛” thick x 1” wide clamps are common) and constructed of the same metal as the ridge/hip flashing or a galvanically compatible metal.
Screws used to secure the clamps should be the same metal as the clamps, or a compatible metal. Holes for the screws in the flashing should be slightly oversized to permit thermal movement. Washers should be placed between the screw heads and flashing to help prevent tear-out.
Special Consideration: If required, expansion clips can be placed at transverse seams to help seat the overlying and underlying flashings to each other.
Ridge/Hip Interface: Where metal ridge and hip flashings intersect, they should be mitered, riveted, and soldered watertight. To relieve some of the stress on the seams, the length of the ridge flashing and each of the hip flashings emanating from the point of intersection may be kept to 3 or 4 feet.